

Living the American Dream: My U.S. Visa Journey!
At 2x years young, single, and maybe a tad picky, I've finally snagged one of the most coveted and challenging visas out there – a U.S. visa! Feeling on top of the world and since many of you have been asking about my experience, I decided to spill the tea and share my visa application adventure.
My U.S. visa idea only sparked after meeting an Indonesian friend in Singapore. He told me I should travel abroad and thought Singapore would be a good starting point to make it easier to obtain a U.S. visa (sort of "credentialing" my passport). About a month later, he got his visa! My curiosity was piqued, and I dove headfirst into researching and starting my own application.
I navigated the entire process solo – research, form completion, and the interview – all without a service or agency. My mindset was just "go for it and see what happens," so I wasn't too stressed about approval or rejection. Truthfully, I didn't think I'd get it! But if you're hesitant about doing it alone, plenty of services can help.
What You Need to Know About Applying for a U.S. Tourist Visa (B1/B2)
There are tons of different U.S. visa types with different purposes. Tourist visas (B1/B2) are super common. I applied for this type, so I'll break down the process.
Getting a U.S. tourist visa basically involves 4 key steps: Filling out the form, paying the fee, scheduling the interview, and acing the interview!
Step 1: Conquering the DS-160 Form
- Head to the official DS-160 form: https://ceac.state.gov/genniv/
- Click the link, select "Vietnam" as your country and enter the captcha code. Click "Start an Application" to get a unique APPLICATION ID (write this down!). Trust me, the form is long, so save your progress often. If you time out, use that ID to pick up where you left off.
- This code is good for 30 days. If you don't finish in that time, the form expires, and you'll need to start over.
Most of the form is straightforward personal info, but ALWAYS be honest! Answer truthfully and 100% accurately. Here are a few sections to pay close attention to:
- Travel Plans: Include details about your trip (if you have concrete plans) or a general overview of your U.S. adventure. Be clear and logical. List hotel details (you can book something on Booking.com just for this) and travel dates. For contact info, use the hotel's address and phone number.
- U.S. Contact: This one stumped me at first. Do you have a contact in the U.S.? If not, are you booking a tour or working with a company there? I was traveling solo, so I used the address and contact info of the hotel I booked on Booking.com.
- Family: Nothing complicated here – just fill in the blanks truthfully.
- Work/Education: Spill the beans on your education history, degrees, career, and travel history. Be as detailed as possible to give them a full picture of who you are! Show ties to your home country that will ensure you return (like your job!). I emphasized the tourism-related aspects of my job. I think that helped. Also, list EVERY country you've visited. Travel history is huge! If your passport is brand new or only has stamps from 1-2 countries, getting a visa will be tougher.
- Finally, upload your photo (white background, 5x5cm, unedited) and submit!
- After submitting, you'll get a confirmation email with your photo and a QR code. Print two copies: one for payment and one for the interview.
Overall, the form isn't hard, but it's long! Be thorough and truthful. It's the first impression, so make it count!
Step 2: Paying Up! (Visa Fee)
- Create an account on this website: https://atlas.my.salesforce-sites.com/?language=English...
- Fill in the registration form carefully with correct details.
- Click on "Schedule My Appointment" on the left. Follow the steps until you reach the payment section. Select the option of "pay at the post office." This generates your U.S. visa payment code. Print this code and your DS-160 confirmation page. Take them to your nearest post office for payment.
- Tell the staff you're paying the U.S. visa fee (160 USD ~ 4000k VND).
- They'll give you a receipt. Keep it safe for the interview!
Step 3: Scheduling Your Interview
- More than a day after paying your fee, log back into your ustraveldoc account. They should have updated your status and show available interview slots. Choose your date and print the confirmation email. You're all set!
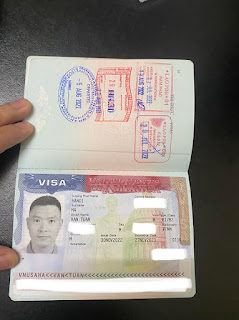
Step 4: Interview Time!
Here's what you NEED to bring:
- Post office visa fee payment confirmation
- Interview appointment confirmation
- Original passport
- Original ID card
- Original household registration book (might not be needed anymore)
- Original birth certificate
- DS-160 confirmation with the QR code
- Two 5x5cm unedited photos with a white background
Documents that can boost your chances (bring them in case they ask):
- Flight/hotel bookings (if you have a detailed itinerary)
- Property ownership certificates, land use rights, savings account statements, bank statements, salary slips...
- Basically, anything that shows your financial stability or strong ties to Vietnam. They might not even ask for them!
I only brought a savings account statement showing 100 million VND (deposited a few days before!) and bank statements from the last 3 months. They didn't even ask!
The Interview Itself:
- Arrive at least 30 minutes early to park and line up. Only bring your documents inside (leave your phone or store it nearby).
- Pass through security, be polite and smile. Hand over your documents for review, get your fingerprints scanned, and head to the interview window. It's quick – just a few minutes!
- You can answer in English or Vietnamese (depending on your comfort level and goals).
- I wanted to answer in Vietnamese to ensure clarity, but I greeted the officer in English and said, "Can I answer by Vietnamese for clearly my answer?" He said okay and continued the interview in Vietnamese. It shows you can speak English if you're traveling independently, but you can still confidently express yourself. I don't think you HAVE to answer in English, just be clear and confident.
- I was asked just 4 questions: What will you do in the U.S., What is your job, Do you have relatives in the U.S., and Are you single or married? I answered honestly. For "What will you do in the U.S.," I gave specific cities instead of just "travel." For "What is your job," I explained how my work relates to tourism and why I love it. He congratulated me, kept my passport, and it was delivered to my door two days later!
Final Thoughts
Honestly, getting a U.S. visa isn't as scary as people make it out to be. It comes down to luck, confidence, and being truthful and detailed in your DS-160 form. Be confident during the interview, and have a decent travel history. Your odds of getting a visa will be high!
This post is long, but I truly wanted to share my experience to help anyone preparing for their own U.S. visa application. I hope it helps, spreads good luck, positivity, and a healthy dose of wanderlust!
```